• GETTING STARTED

Getting Started

Welcome to aplonAPI Developer’s Portal. Developers can use aplonAPI in order to create new applications by using our APIs. In the Portal, users will find detailed API documentation, onboarding and application registering workflow, a Private Sandbox to test their application with extensive logging and reporting for API calls, billing and marketplace features, and the Live environment. As Sandbox environment offers most of the features of the Live, developers can properly test their applications before they publish them and interact with real data. In order to use the Live environment and call PSD2 APIs, users should have a valid certificate, from a certified provider.

The developer’s onboarding process is facilitated through the registration form of the portal.

  1. Please go to Login page
  2. Select Sign-up
  3. Complete the form and activate your account using the link sent via confirmation email
  4. You have now access to Sandbox and Live environments

The amount and type of information requested during this process will help the institution to identify the user. After the registration, the developers will have a user profile and they will gain access to the Sandbox & Live environment functionalities of the Developers Portal. Create an application, select a product for your application and you are ready.

Sandbox offers a safe and simple way to try our APIs and familiarize with existing and upcoming functionalities. For each application created in the sandbox environment, automatically a set of users and accounts will be created for testing purposes. Users can select the Bank Accounts links to navigate to each application’s Sandbox environment. There will be 3 users, and 2 bank accounts for each user. If there is a need to revert the sandbox environment of an application to the initial state, click on the Clear Transactions button and the bank accounts will be reset to the initial values.

Security is an important aspect, and all APIs are developed by using well-tested and widely adopted security schemes. Each new application will have a Client ID and a Client Secret, and these with the Access Token and the Signature are sent in the header of the request. All the communication between the API and the client is secured by TLS, which encrypts the traffic. When creating an application, it is important to ensure the safety of the credentials and the tokens to avoid any leakage of the confidential information in wrong hands.

In the paragraphs below you can see the APIs that are included in the Authorization Process

  1. Authorization Code Request
  2. Exchange Authorization Code
  3. Refresh Token
  4. Client Credentials Request
  5. Access Token Usage
  6. Token Details

The authorization code grant type is used to obtain access tokens and is optimized for confidential clients. Since this is a redirection-based flow, the client must be capable of interacting with the resource owner’s user-agent (typically a web browser) and capable of receiving incoming requests (via redirection) from the authorization server. In the diagram below you can see a high-level diagram of the Redirection Process.

Authorization Code Flow


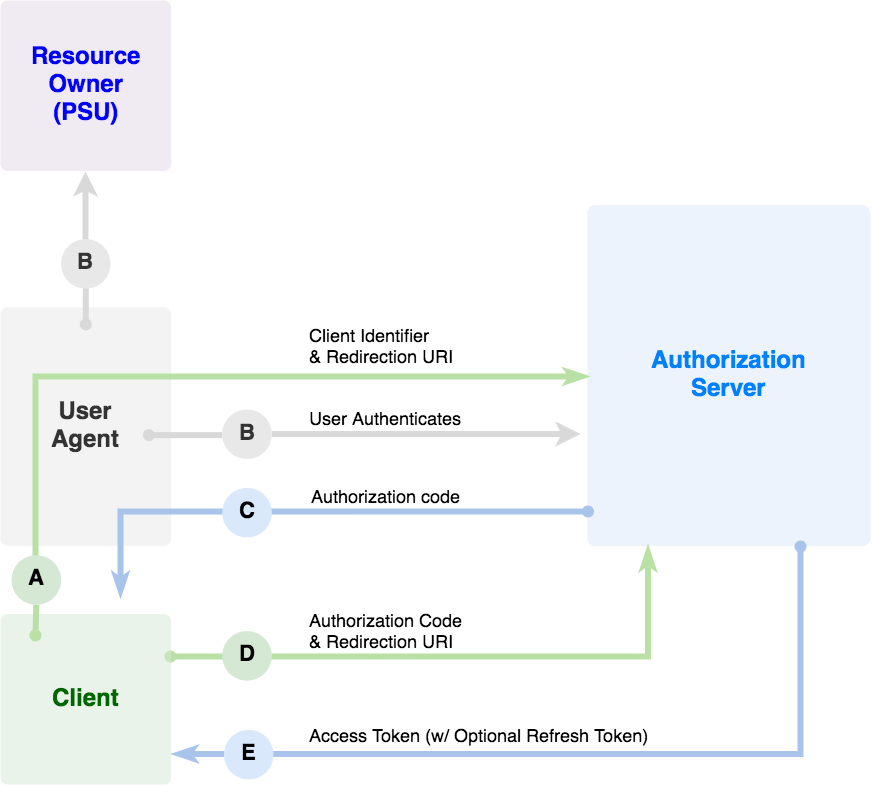
The first step for the developer will be to request an authorization code from the application. The PSU will be redirected to the OAuth2 login and will be asked for credentials. You can see how to get the code below for both environments (Sandbox/Live).

State parameter is optional, whatever is inserted there, it will get back to the application in the redirect uri.

SandBox

				
					[GET] https://sandboxoauth.bisonbank.com/oauth2/auth?response_type=code
&client_id=YOUR_CLIENT_ID
&redirect_uri=https://yourapp.com/oauth/redirect
&scope=post.v1.credit.transfer,get.v1.account.report
&state=my_sample_state_b64_encoded


Live

				
					[GET] https://oauth.bisonbank.com/oauth2/auth?response_type=code
&client_id=YOUR_CLIENT_ID
&redirect_uri=https://yourapp.com/oauth/redirect
&scope=post.v1.credit.transfer,get.v1.account.report
&state=my_sample_state_b64_encoded


If client is valid and the resource owner makes a successful login, the OAuth2 server will redirect the resource owner to the provided redirect uri.

				
					https://yourapp.com/oauth/redirect?code=YOUR_CODE
&state=my_sample_state_b64_encoded


If an error occurred or resource owner denied access, an error response will be returned back to the redirect uri.

				
					https://yourapp.com/oauth/redirect?error=access_denied
&state=my_sample_state_b64_encoded


Exchange Authorization Code

Once the user gets to the redirect uri, the authorization code, that was obtained from the OAuth2 server must be exchanged with an access token, through the following POST request.

SandBox

				
					[POST] https://sandboxoauth.bisonbank.com/token/exchange?grant_type=authorization_code
&redirect_uri=https://yourapp.com/oauth/redirect
&code=YOUR_CODE
[Headers] Authorization: Basic Base64Encode(YOUR_CLIENT_ID:YOUR_CLIENT_SECRET)


Live

				
					[POST] https://oauth.bisonbank.com/token/exchange?grant_type=authorization_code
&redirect_uri=https://yourapp.com/oauth/redirect
&code=YOUR_CODE
[Headers] Authorization: Basic Base64Encode(YOUR_CLIENT_ID:YOUR_CLIENT_SECRET)


After successfully submitting the exchange token, this request will return a JSON object containing the access token as follows. The object contains also the Refresh Token.

				
					{
    "token_type": "Bearer",
    "access_token": "YOUR_ACCESS_TOKEN" ,
    "client_id": "YOUR_CLIENT_ID",
    "scope": [
        "post.v1.credit.transfer",
        "get.v1.account.report"
    ],
    "created_on": 1510228872331,
    "expired_at": 1512820872331,
    "refresh_token": "YOUR_REFRESH_TOKEN",
}


In every access token refresh process (see below) a new refresh token will be generated. Access tokens can be refreshed for 90 days. After 90 days the developer has to get a brand new access token.

Sandbox

				
					[POST] https://sandboxoauth.bisonbank.com/token?grant_type=refresh_token
&refresh_token=YOUR_REFRESH_TOKEN
[Headers] Authorization: Basic Base64Encode(YOUR_CLIENT_ID:YOUR_CLIENT_SECRET)


Live

				
					[POST] https://oauth.bisonbank.com/token?grant_type=refresh_token
&refresh_token=YOUR_REFRESH_TOKEN
[Headers] Authorization: Basic Base64Encode(YOUR_CLIENT_ID:YOUR_CLIENT_SECRET)


					{
    "token_type": "Bearer",
    "access_token": "YOUR_ACCESS_TOKEN" ,
    "client_id": "YOUR_CLIENT_ID",
    "scope": [
        "post.v1.credit.transfer",
        "get.v1.account.report"
    ],
    "created_on": 1510228872331,
    "expired_at": 1512820872331,
    "refresh_token": "YOUR_REFRESH_TOKEN",
}


The client can request an access token using only its client credentials. The access tokens that will be generated from this flow, should be used only to access APIs that do not need the consent of an account owner, otherwise the request will fail. See the requests for Sandbox and Live environments below.

Sandbox

				
					[POST] https://sandboxoauth.bisonbank.com/oauth2/auth?grant_type=client_credentials
[Headers] Authorization: Basic Base64Encode(YOUR_CLIENT_ID:YOUR_CLIENT_SECRET)


Live

				
					[POST] https://oauth.bisonbank.com/oauth2/auth?grant_type=client_credentials
[Headers] Authorization: Basic Base64Encode(YOUR_CLIENT_ID:YOUR_CLIENT_SECRET)


If the access token request is valid and authorized, the authorization server issues an access token as follows.

				
					{
    "token_type": "Bearer",
    "access_token": "YOUR_ACCESS_TOKEN" ,
    "client_id": "YOUR_CLIENT_ID",
    "scope": [
        "post.v1.credit.transfer",
        "get.v1.account.report"
    ],
    "created_on": 1510228872331,
    "expired_at": 1512820872331,
    "refresh_token": "YOUR_REFRESH_TOKEN",
}


In order to make authorized API calls you have to include your access token in the ‘Authorization’ header.

				
					[Headers] 
Authorization: Bearer YOUR_ACCESS_TOKEN
x-client-id: YOUR_CLIENT_ID


In order to revoke an access token, the following endpoint has to be called

Sandbox

				
					[DELETE] https://sandboxoauth.bisonbank.com/token
[Headers] Authorization: Bearer YOUR_ACCESS_TOKEN


Live

				
					[DELETE] https://oauth.bisonbank.com/token
[Headers] Authorization: Bearer YOUR_ACCESS_TOKEN


In order to get details about an access token, the following endpoint has to be called

Sandbox

				
					[GET] https://sandboxoauth.bisonbank.com/token/details
[Headers] Authorization: Bearer YOUR_ACCESS_TOKEN


Live

				
					[GET] https://oauth.bisonbank.com/token/details
[Headers] Authorization: Bearer YOUR_ACCESS_TOKEN


					{
    "client_id": "YOUR_CLIENT_ID",
    "scope": [
        "post.v1.credit.transfer",
        "get.v1.account.report"
    ],
    "created_on": 1510228872331,
    "expired_at": 1512820872331,
    "redirect_uri": "http://validUrl.gr",
}


See below the most common OAuth2 error responses.

There is a different authentication process between PSD2 TPPs and B2B TPPs. See in the following section details for each process.

Once the tests in the sandbox environment are completed, users are ready to go live. A QSeal type pf eIDAS certificate is required for TPP authentication as defined by RTS. That means, a digitally signed request where the TPP will use their eIDAS certificate, issued by one of the QTSPs operating in EU/EEA. In each country there is a National Competent Authority that grants a PSD2 license to the TPPs, including a unique ID of the TPP. By acquiring an eIDAS certificate from a QTSP, the certificate holds this unique ID which is then used to identify the TPP in question when establishing a connection to one of the ASPSPs.

There are currently several QTSPs operating in EU/EEA who can issue QSeal certificates. EU maintains a website which lists all issuers. The website is called Trusted List Browser. From this site, a QTSP can be located by selecting a type of service, which should, in this case, be “Qualified certificate for electronic seal” under “Qualified trust services”

Certificate Process:

  1. In profile page, developers can see the tab “PSD2 CERTIFICATES” where the certificate will be used
  2. The developer adds the public key of its PSD2 certificate at the field named QSEAL.
  3. The developer signs the given challenge with the private key to create the signed signature. Use the certificate’s Signature algorithm to sign the challenge (See Signature Instructions below).
  4. The developer will paste the signed signature in aplonAPI’s corresponding field.
  5. As the system gets the signed signature, it will verify that the developer is the owner of the certificate.
  6. Then the system extracts specific PSD2 attributes from the certificate and the authentication process starts based on this information
    1. Checks that certificate was signed by a known QTSP with active status
    2. Checks the existence of the TPP ID in the EBA’s TPP Registry
    3. Exception to the above checks is the case that the TPP is a registered ASPSP. In this case the system ignores the EBA List for the registration and considers only the valid certificate.

After the successful registration, the TPP must use the same certificate in each API call. That means the request body of each request has to be signed with the QSealC’s private key in each POST and PUT request.


Signature Instructions:

The java class below can be used to generate signatures that aplonAPI requires in the developers portal, in order to verify the ownership of the private key, and in each POST API call.

Use this CLI tool to produce a valid signature for aplonAPI.

3 parameters needed:

  1. The private key in a file in PEM format.
  2. The certificate in a file in PEM format.
  3. The text to sign in a separate file. This could be a string to sign, like the challenge given by the portal or any JSON structure that needs to be signed in the API calls.
				
					java -Dprivate.key=pathToPrivateKey -Dcertificate.pem=pathToCertificate -Dtext.to.sign=pathToTextToSign


					import org.bouncycastle.jce.provider.BouncyCastleProvider;

import java.io.ByteArrayInputStream;
import java.io.IOException;
import java.nio.file.Files;
import java.nio.file.Paths;
import java.security.KeyFactory;
import java.security.PrivateKey;
import java.security.Security;
import java.security.Signature;
import java.security.spec.PKCS8EncodedKeySpec;
import java.util.Base64;

public class Sign {
    public static void main(String[] args) throws Exception {
        Security.addProvider(new BouncyCastleProvider());

        String privateKeyString = fileToString(System.getProperty("private.key"));
        privateKeyString = removeRedundantPrivateKeyParts(privateKeyString);
        String certificateString = fileToString(System.getProperty("certificate.pem"));
        certificateString = removeRedundantCertParts(certificateString);
        String finalFormText = fileToString(System.getProperty("text.to.sign"))
                .replaceAll("\\n[ ]*", "")
                .replaceAll("\\r[ ]*", "")
                .replaceAll("\\t[ ]*", "")
                .replaceAll(":[ ]*", ":");
        byte[] data = finalFormText
                .getBytes("UTF-8");
        String signatureAlgorithm = "SHA256withRSA";

        KeyFactory kf = KeyFactory.getInstance("RSA");
        PKCS8EncodedKeySpec keySpecPKCS8 = new PKCS8EncodedKeySpec(Base64.getDecoder().decode(privateKeyString));
        PrivateKey privateKey = kf.generatePrivate(keySpecPKCS8);
        Signature sig = Signature.getInstance(signatureAlgorithm);
        sig.initSign(privateKey);
        sig.update(data);
        byte[] signatureBytes = sig.sign();
        System.out.println("Private: " + privateKeyString + "\n");
        System.out.println("Public: " + certificateString + "\n");
        System.out.println("Algorithm: " + signatureAlgorithm + "\n");
        System.out.println("Challenge: " + fileToString(System.getProperty("text.to.sign")) + "\n");
        System.out.println("Challenge after modifications : " + finalFormText + "\n");
        System.out.println("Signature: " + new String(Base64.getEncoder().encode(signatureBytes)));
    }

    private static String fileToString(String filePath) throws Exception {
        String content = "";
        try {
            content = new String(Files.readAllBytes(Paths.get(filePath)));
        } catch (IOException e) {
            e.printStackTrace();
        }
        return content;
    }

    private static String removeRedundantCertParts(String originalCert) {
        return originalCert
                .replace("\n", "")
                .replace("\r", "")
                .replace("\r\n", "")
                .replace("-----BEGIN CERTIFICATE-----", "")
                .replace("-----END CERTIFICATE-----", "")
                .replace(" ", "");
    }

    private static String removeRedundantPrivateKeyParts(String originalPrivateKey) {
        return originalPrivateKey
                .replace("\n", "")
                .replace("\r", "")
                .replace("\r\n", "")
                .replace("-----BEGIN PRIVATE KEY-----", "")
                .replace("-----END PRIVATE KEY-----", "")
                .replace(" ", "");
    }
}


For B2B APIs and Products, once testing in the sandbox environment is completed a x509 certificate will be required. This x509 certificate should be sent in each API call. To get the x509 certificate, users have to provide a CSR (Certificate Signing Request) and they will get back the signed certificate.

In this section, we will collect the common error responses that the users of the system will get back.

Scroll to Top